Monday, September 14, 2015

Yeah, I know, I see 'em; they're very big. Well, it was fun. I'm gonna go take a nap now and then I think I'm gonna call, uh, some hospitals.

I have been helping a lot with the poopers lately.  My painting projects have been suffering due to this.  I did start a 15mm WW2 desert project recently.  I found a set of rules that work very well for company level skirmishes.  It is called Manouvre Group.  Earlier this year I picked up a PdF copy of Operation Compass from Too Fat Lardies.  It is a scenario book that focuses on the early actions in North Africa.  The opponents are Italians and the various British allies.  There is quite a bit of action and fairness to be had.  I love the Italians in WW2.  So I decided to give in and paint up some Italian vehicles.  Here is the first batch of stuff.  I have another M11/39 batch on the way.  


 This is the M11/39 Italian tank.  It was already obsolete when it got to the desert.  Italian tankers still carried on and used it anyway.  The tank is an odd design.  The 37mm gun in fixed in the super structure of the hull.  It can only traverse 15 degrees to the right or left.  The turret has double machine guns.  The idea was that the turret could engage enemy infantry while the main gun blasted tanks.  It seems like a good idea because (in theory at least) the crew could fire both weapon systems at the same time.  The outcome was pretty bad.  The TC had to much to do.  He had to direct the tank, spot enemy tanks AND infantry and watch the command tank for flag signals.  These tanks had no radios.  The crew compartment was also very cramped.

To add to this dreary tank the hull plates were riveted together.  Every time a round hit the tank (and did not destroy it completely) the rivets would come undone and bounce around inside the tank.  It was a death trap.  As a tanker myself I felt very confident in the M1A1's ability to defeat any round thrown at it.  These tankers knew they were out gunned by the British.  They soldiered on with that knowledge.  This camo pattern is one of several patterns used by the Italians.  There is a recognition marker on the back of the turret of the Italian flag.  I refrained from putting other designations on the tank because all the photos I could find did not have many marking at all.


 This little guy is a L3/35 tankette.  It has twin machine guns.  This vehicle is even worse than the M11/39.  The L3/35 code stands for Light 3 ton / 1935.  It is a light 3 ton tank made in 1935.  You can imagine the M11/39 stands for Medium 11 ton tank made in 1939.  The M13/40 and M14/41 follows the same pattern.  The Italians were not that creative with their vehicle names.  None of them had nicknames.  Well, the 75mm Semovente tank destroyers had names.  Those vehicles had positive accounts from the Italians and even the Germans.  What is interesting about this little tankette is that men drove these into combat against Shermans and Grants.


 L3/35s and M11/39 in convoy formation.

 I gave into impulse and bought a few things for my Italian and Silicy campaign.  These unpainted tanks are Panther V Ds.  I am going to go into more detail with them later.  I made them very muddy.


I played my first game of DbA 3.0 this Saturday.  One guy was very interested in it.  He used to play it with his dad when he was a kid.  The game was between Ming Chinese and Athenian Greeks.  I converted my Irregular Wars troops over to DbA standards.  I got some of my other 6mm forces for Irregular Wars in the mail recently.  I was disappointed because the models were about half the size of the Baccus models.  The company is called Irregular for a reason.  I am tempted to return them.  They are just to small for me to use.  

The battle was a close.  My opponent rolled multiple ones for PiP initiative.  The dice gods were nice to me.  I rolled 4 sixes in a row!!  He could not clean up his lines after they had been disrupted by crossbow fire from the Ming.  My take away is that putting your troops in column can make them much more flexible for where you will battle.  Artillery is very strong when assaulted by cavalry.  I felt like we did something wrong there.  The game was a blast, and I look forward to playing again.  I have a Later Nomadic Mongol army that is currently being assembled for play.  They were racial enemies of the Ming.    


 The Greek setup.  The fields did not affect movement.

The Ming setup.  My Ming forces eventually won.  I got luck due to the Greeks low PiP dicing and strategic application of ranged fire.  It disrupted his battle line enough that the fight was even instead of my blades being overlapped. It was a very close game and I am sure my friend will do better next time.

Thursday, August 6, 2015

And be sure to thank Sir Loin for keeping me up all night. Yeah, I do that. Hey, I thought that oysters had shells?

I have some new goodies that I have been working on over the last few weeks.  I have a nice variety this time.  
The first thing on the list today is Warfare in the Age of Madness.  I have started the warband that I am really excited about.  This team is an inside joke between a friend and I that goes back at least 20 years.  I will explain the joke on a later day.  This warband is called the Dew Lords or Dew Scavengers if someone wants to be condescending.  The only focus of these men is to roam the countryside looking for cans of Mountain Dew.  The warband is entirely mobile.  I only have a portion of it.  The last vehicle had some mail issues and has to be resent to me.


 Here is the gun truck built around a HeMMT.  I looked up actual photos and based my design on something used in deployment zones.  I want to add some detail inside.


This dune buggy is one of the teams that scout ahead for Dew stashes and radio in to the convoy for support.  It is very heavily armed but lightly armored.  The HeMMT and the FaV (Fast Attack Vehicle) are from Quick Reaction Force miniatures.  They are a UK based company and have a large variety of vehicles I could not find elsewhere.  My only complaint is that the HeMMT took forever to clean all the flash and excess resin.  The FaV was easier on flash but it took me forever to build it.  I had to go to Scale Creep Miniatures and look up the photo of the instructions.  Even with that it was still challenging.  I would like QrF to put assembly instructions in the bag the FaV comes in.


This is the command stand and the medic stand.  I gave the leader of the Dew Lords an auto shotgun.  The leader is based around my friend.  I modeled myself in the back call the column to a halt while the leader reaches for the radio man's handset.  This force has very good and developed coms.

The last Warfare pic is the mk19 team and an objective marker.  I am happy that this mk19 team is my first successful soldering job.  I have struggles with trying to solder in the past.  I did the mk19 stand with no mistakes!  The stand still needs a gunner.  The objective is a pallet in the road laden down with mountain dew boxes and loose cans.  The other objective will also have mountain dew on it (each competing warband has two objectives on the table for a total of four objectives). 


 Irregular Wars!!  I love this game.  It has so much variety.  I have a load of Ming Chinese to show off.  The first stand is a trained cavalry company.  Ming soldiers wore rawhide armor lacquered red or black.

 Here are some grenadiers with smoking grenades.  There is a spearman covering them in case they get rushed by suicidal Japanese.


 This is the General company based inside a trained cavalry stand.  The yellow triangular flags with the symbol is the official flag of the Ming Dynasty.  The striped flag symbolizes the extent of the control of the Ming..  Yellow stands for center and red, black, white and blue are the cardinal directions.  I am guessing Yellow is the Ming Dynasty and the four colors say it's control covers every direction as far as the eye can see.  The Yellow Dragon flag is a bit of a stretch.  It appears during the Qing Dynasty in the 18th or 19th century.  I included it to make the general's stand pop on the table.
My knowledge about the flags may be wrong.  If someone catches a mistake please let me know.  Chinese heraldry and flags are a hobby of mine.
 Here is the Ming force painting progress.
 I have decided to start my Hostile Realms High Elf army.  These stands are the skirmishing archer elves and their commander.  I based them on 40mm by 80mm plasticard stands.  The smaller circular base is the section's commander.
 This stand is the hero stand.  He has a small escort, a banner and several musicians.  High Elves like to be noticed.  They are haughty after all.

This stand is a High Elf Cavalry unit.  I need to add another row of eight warriors.  They are the Knights of the rising moons.  Every 100 years the twin moons overlap each other.  This is a sacred event for the High Elves as they worship the goddess "The Lady of the Full Moon".
I do not have names for all of these sacred events.  The High Elves are really into all things lunar.


I have been getting over what I think is food poisoning.  It is miserable and I would not wish it on an enemy.  I hope to get some more painting in soon.

I have a Irregular miniatures order arriving in the mail any day.  I will then be able to start a European Age of Discovery army for Irregular wars.  My painting and modeling schedule is as follows:
Ming Chinese - Painting and some modeling
Survivalist warband - modeling and painting
The Dew Lords - modeling and painting
DbMM Greeks - Painting the remaining models

Once I finish all of this I will have a lot of back log finished.  My long term goal is to complete my DbMM 2/5 Later Hoplite Greek force.

Tuesday, July 14, 2015

No, I-- you know, I remember eating carpet. Not so much the lasers and the robots though.

My painting goals for the year have fleshed themselves out.  I am working on my Ming Chinese
for the moment.  After that is finished I will finish the Hardened Survivalists for Warfare in the Age of Madness.  I will then jump over to another Irregular Wars force.  It will be something European.  So far the Hollanders and the French Adventurers are drawing my attention.  My last goal is to work on the Dew Scavengers for Warfare.  The vehicles for the Dew Heralds and the Dew Regulars are in the mail as I type.  I am really excited about getting those models.  I have some cool modeling plans for those vehicles.

 I have discovered a new game.  It is called "Irregular Wars".  The game features warfare between nonprofessional troops in the 15th and 16th century.  It covers the entire world with armies from Europe, the New World, the Middle East, the far East and the Pacific Islands.  I actually like this game more than DbA for several reasons.  It does not replace the game but it almost comes close.  If I had to choose what to play I would pick Irregular Wars.

The game simulates irregular warfare quite well.  For such a simple game it had a lot under the hood.  I missed this complexity until I played a test game between Dutch privateers and the Ming Chinese.  The Dutch were riddled by disease after rolling on the logistics table.  The Chinese had a few stragglers to the battlefield but nothing else bad happened.  That is the thing about this game.  Your beautifully painted forces that you planned out for weeks could not make it to the table.  If you think about how expeditions to the new world reached their destination with half the company they set out with it makes sense.  The pre game setup enriches the narrative and makes the game more enjoyable.  I advise caution if you get mad about bad things happening to you before the game starts.

The other cool mechanic is the Lord's command range.  If units are outside of it during the action phase they act on their own initiative.  Sometimes you get lucky and roll a 6 and can move the unit freely.  Be prepared to have companies sit still when they should advance or rush forward when they should sit still.  Pro tip:  Do NOT let your unreliable companies get out of your Lord's command range.  I learned this the hard way.

At the start of the battle you have a few reliable companies that are guaranteed to show up (well,almost...).  You then pick 5 optional companies from your nation's list.  You get to roll a d6, d4, d3, d2, or 1 for the unit's quantity depending on what it is.  If you roll high your lord has lots of men flock to his banner.  The Ming and the Dutch both rolled poorly on the mustering of forces.  It is a totally random feature that makes every game different.  This can be a turn off to new players because a few poor rolls will tilt things one way or the other.  The logistics rolls can even this out.  The Dutch had so many poor rolls because of a "Unhealthy Climate" card.  It reduces logistics rolls by 1.  You can also use terrain to play the defensive game and whittle down the enemy's forces.

That leads me into the last cool feature of this game.  Each player draws 3 cards from a special deck of 52 cards.  These cards can affect the game quite a bit.  The "Unhealthy Climate" card is one example. Other cards are "Rain Clouds" which stop all black powder weapons from firing for a turn.  I have only played one game so I am not to familiar with the full extent of the cards.

Irregular Wars is available for $14.99 on Wargame Vault.  I did not get any benefits for promoting this great game.  I wish I would but you do not always get free stuff.  I do it because I find the period intriguing and the game is cool.  I was very pleased to see that there is a lot of subtlety in the game.  It was very easy to overlook it because of how simple the game rules reads.  I also want to say that the rules are very thorough and well written.

I am currently working on my Ming Chinese forces.  They have loads of cheap levy infantry and can do wave attacks.  If you roll super high and take all the levy options you can have a total of 18 Wei-Suo Levy on the table.  Keep them in range of your general or all hell will break loose as they either rush forward or stay still or flee.  My first experience with them was terrible as I rolled poorly for the muster and managed to keep most of them out the General's command range.


Here are the Ming Grenadiers.  The green bushes are actually smoke from the clay pot bombs they are about to throw.  There is a spearmen in the back hanging out.  Grenadiers are great for damaging the enemy and they have great movement ranges.  I do think grenadiers in general need the "Loose" trait. They are few in number and it makes sense that they would be skirmishers.  They need support because they do not fare well in combat.
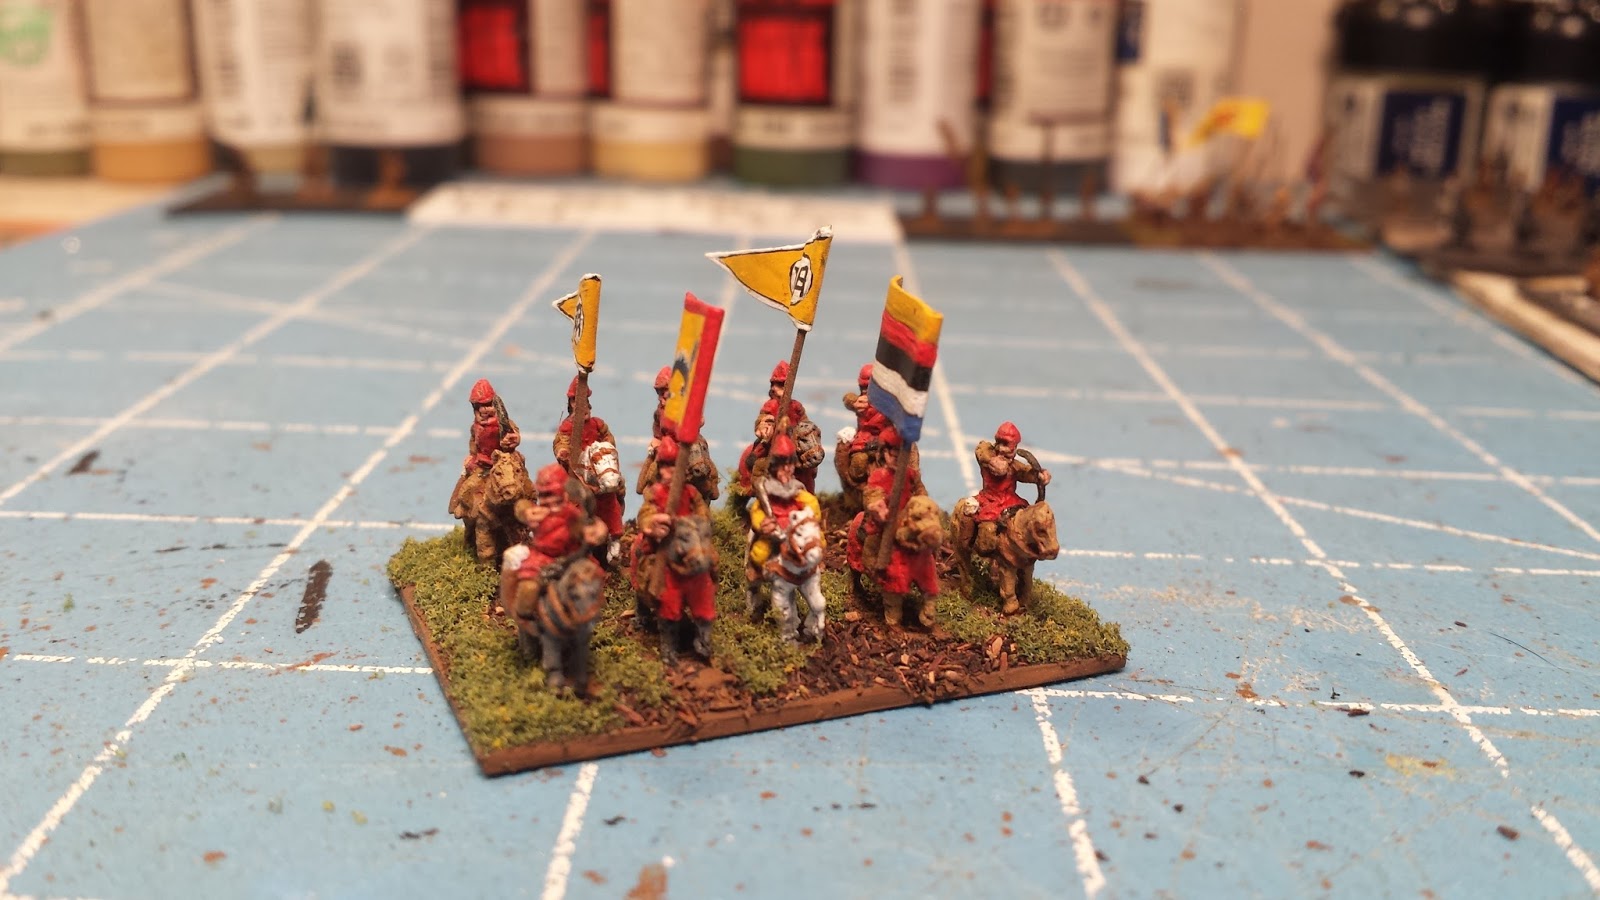
 These are the banner men for the Ming General.  The triangular flags are actual Ming banners.  I wish I had more knowledge about the flags the Ming used in battle.


 The next two pics are of the compulsory Wei-Suo Levy companies.  One of these stands have shown up before.  I am excited about the Baccus 6mm retainers.  I want to add more farming implements into the spear mix.  I may even add a few pole arms to make them look cooler.
 The horse men stand with 6 figures is the general's stand.  The banner men from above are destined for those empty spots.  The other stand is just a normal cavalry stand.  I used Baccus armored archers.  They were given lances cut from a straight pins.  There is evidence of Chinese horsemen using only bows or crossbows.  Some of them used lances and had bows as well.  I feel the modelling possibilities are very open.


The next three pics are of my favorite model in the army.  The Ming used rocket launchers in combat. I used plasticard, wires of differing thicknesses and straight pins to make it.  It took some time but I feel it looks great.  I did some research and saw a picture of the model available from Irregular miniatures in the 6mm range.  I almost bought but it had a pack camel.  Camels in China?  I decided to scratch build it myself because it was such a simple design.  The launcher is missing wheels.  This launcher is bodily picked up by two of the crews and humped to the next location.  It can be moved one base width in the action phase.  The other two crew carry the extra rockets.


These crossbow men are also repeat offenders.  They are Levy archers.  Their quantity is determined by a d4.  The only downside is that they are unreliable.  

Here are some of the mercenary troops that supplement the mass of useless levy.  They were made with Baccus Ashigaru, straight pins and pieces of a credit card.  I had a lot of fun making these guys.  The halberdiers on the right look a little more irregular then the spearmen.  I also included the Ming symbol on their flag.  It needs something else...probably a border.  From what I could tell most Chinese flags had a border.  


 These horsemen are the wild barbarian tribes that throw their lot in with the Ming.  They are great at shooting and moving around the battlefield.  I have not figured out how to use them because their movement range can put them out of the general's command distance in one turn.  The models are Baccus Huns at the gallop.  They look great.  Once I figure out how to paint them it should be easy to finish them up.  I feel that they played in character quite well.  They ran to far away, stayed put, then raced back across the Ming lines and started shooting at the enemy.  Barbarian conscripts must have been a headache for generals as they were a liability.  I really felt that way as I watched them run wild over the battlefield.


Saturday, July 4, 2015

Is the album selling? Cuz I only see two of you.

I played my first battle of Warfare in the Age of Madness.  I must be mad because I played the game solo.  The two forces that were recently painted were the combatants.  These are the 4th Reich and the Leftist Gureillas.  The game dispelled the theories that I had about how the game performs.  I will give my thoughts at the end of the report.  All of the terrain is scratch built except for the blanket.  I apologize for the sun in several shots.


The objectives are set up in the general center of the board.  The Infected horde is near the middle as well.  It is contesting the objectives.  A supply marker cannot be scavenged if a enemy or non player enemy is within 8 inches.  A NpE is an infected stand, Marauders (armed looters and bandits) and booby trap/mines/IeD stands.  You have to neutralize the threat before scavenging the supply markers.  The 4th Reich won the dice off and decided to be the blue player.  This forces the other player or red player to set up first.  Their recon stand gets to move for free (they do not have one).  After the recon move the entire blue player force gets a free move.  When the game starts the red player gets to move first.  Being the blue player is advantageous but it can tip your opponent off to your strategy.  

Another caveat is the game's weapon ranges.  A bound is 4".  Units fire according to the number of bounds.  An assault rifle team can fire 2 bounds.  A HmG team fires 4 bounds.  Rifle/Mg teams are 3 bounds.  It never felt realistic to me.  I changed it to this method.  
The game ranges say 1 bound is a 3+ to hit.  Ranges out to 4 bounds are 4+.  Anything beyond that is 5+.  A rifle team's range is 3 bounds.  The ranges now have 3 bound.  This means a rifle team can fire a 3 / 6 / 9 bounds.  The rifle team hits on 3+ from 1 bound away.  It hits on 4+ on bound 2-4.  Bounds 5 - 9 hit on 5+.  Hitting at more distant ranges can be difficult if units are in cover.  It means that units caught in the open are likely to be pinned and hurt by fire.  It appeared to be balanced during my playtest.  I talked to the game designer by email about this.  He said that the shortened ranges was to make the game more tactical.  It makes close combat oriented forces able to get into melee much more easily.  I realize that this makes close quarters battle and blade teams harder to use well.  I think the range changes accurately reflects modern combat.  Just look at the Civil War for an example of how accurate fire affects troops moving in the open.      

 This is after the 4th Reich's elements have moved out.  It is hard to see but the tracks are in column on the bottom left corner of the field.  The recon Rifle/Mg and the sniper team are near the center beneath the swamp.  The mechanized troops deployed out of the truck and went on alert.  The M113s  also went on alert.  I made a mistake with the recon team by leaving it in the open.  The leftists are set up in the woods on the opposite side of the board.
 The Leftists moved up the board.  Half of the force headed for the irrigation fields and cover.  The other half moved around the barn.  The FO set up at the corner of the barn and called down medium mortar fire on the 4th Reich recon team.  They took a wound.  The 50 cal team set up at the edge of the woods to cover the advancing infantry teams.
The infected activated and started to move.  This set off all the alert marker teams.  The Infected ate two volleys of .50 cal rounds and an assault rifle team's shooting.  It finally went down.  If used correctly Infected can really cause problems for you.
The 4th Reich turn went well.  The recon pulled back into the woods and scavenged a supply marker.  The m113s advanced into the cover of the woods and put some fire on the leftist teams in the fields.
The Leftist turn 2 was more moving and not much shooting.  The mortar team was silent.  The 50 cal team fired at the m113s but did not cause damage.  There was some rallying of the infantry teams.
The 4th Reich turn 2 started with the infantry teams and the MG team deploying from the m113s.  The Recon team stayed put while the medic team moved to heal it.  The Opel Binz truck started to move across the river.
 Turn 3 was pretty bloody for the leftists.  The m113s and the mg team accounted for at least two team losses and some suppression.  The Leftists in the fields were pinned down and unable to do much.  The rest of the leftist army moved into position.  The Opel Binz truck moved up to the swamp.  The recon team was patched up by the medic.
 Turn 4 was unfortunately the last turn I was able to play.  The Leftists set off the booby trap set by the 4th Reich.  A Leftist Rifle/Mg team's LAW took out an m113.  A few more Leftist infantry teams were hurt by fire and pinned down.  A lone CqB team took fire from several 4th Reich teams.  It was down to one wound and was pinned.
 This is where the game stopped.  The tally at this point was probably in the 4th Reich's favor.  They had inflicted several losses on the enemy and taken a supply marker.

The battle was a fun one.  I definitely play mechanized forces better than foot based ones.  The 4th Reich had Hawkeyes as a special trait.  It makes them better shots.  This ability really made up for their lack of numbers.  One nice thing about WitAoM is that you have the option to make large forces of poor troops or small elite units.  The options are endless!  The 4th Reich's tiny force performed very well even though they were outnumbered.  The leftists rolled a very poor deployment set up.  They had some open space to cover and could not reach it quickly enough.  The m113s were able to scoot up the board and pin them down.  Close quarter battle teams really need some troops in front of them to cover their advance.  Putting them up against long ranged teams is a sure way to get them killed.  I am surprised that the Leftist force requires more finesse than the mechanized one.  On the last turn the Leftists started to hurt the 4th Reich's troops.  But I doubt it would be enough to turn the battle.  I should have used the mortar team more.
This kitteh earns the most annoying player award.  He repeatedly tried to walk into the middle of the battlefield.  His goal was to sit down and stare at me while his tail bumped terrain and figures.  To make matters worse he weighs around 25 pounds.  He settled for the tupperware container as a compromise.  Chairman Meow won the MaP award.